Creating a Gantt chart for Basecamp 2
Let’s get into detail how you can easily create Gantt charts for one or multiple Basecamp 2 projects with Ganttify.

Basecamp is a great project management application that empowers companies big and small to tackle each size of project with ease. Planning is a big part of managing these projects and that’s why we have created Ganttify: to add the power of Gantt charts to your Basecamp 2 projects .
This article is about creating Gantt charts for Basecamp version 2. If you are using a newer version of Basecamp, please check the following article: Creating Gantt charts for Basecamp .
This article serves as a quick guide to get you started using Ganttify for your Basecamp 2 projects. I assume you already have a Ganttify account before we get started. If not, you can sign up for a free 14 day trial .
Let’s get started.
Ganttify interprets two sets of data from your Basecamp 2 project:
- Events
- Todo's (tasks)
Events: events with just a start date & time
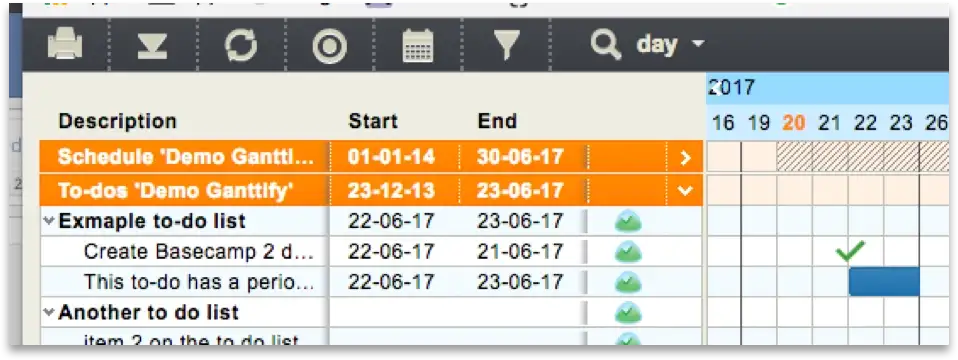
When you’re only adding a start time to the event in Basecamp, it will show up as a green checkmark in the gantt chart, like so:
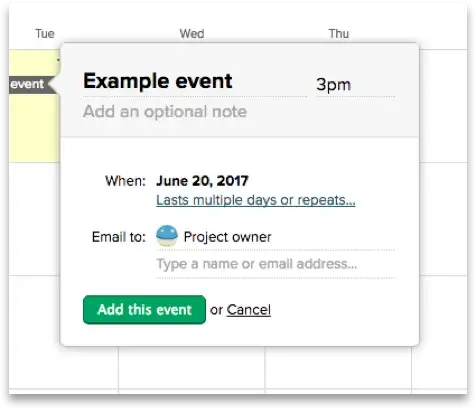
Note that the lower part of the green checkmark is the indicator where this event starts. Therefore, in the ‘day’ zoom level, you’ll see it partially hanging over to the next day.
Events: defining a start and end date
When you choose to create a multi-day event, Basecamp gives you the option to define a start and end date, like in the following screenshot:
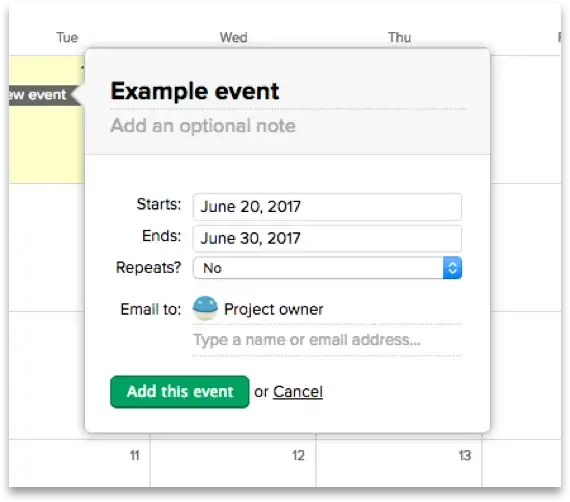
This results in a timeblock in the gantt chart as you can see here:

As you can see; all you have to do is work within Basecamp and fill out the details of each event and Ganttify will take care of the rest. When you create multiple timeblocks and check marks like this, you can truly apply the power of gantt charts on your projects.
Next up: To-do’s.
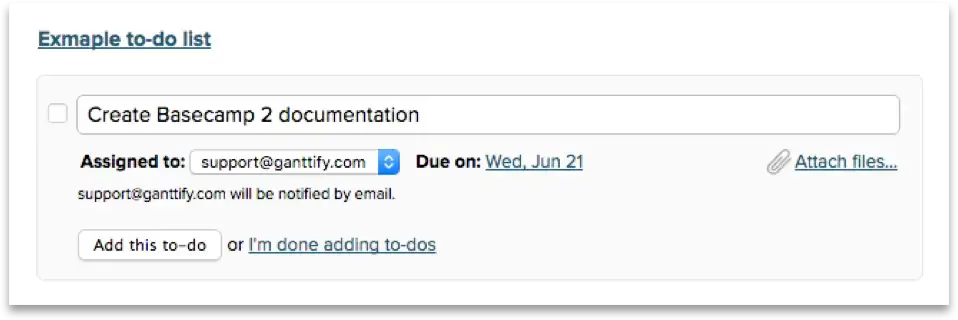
To-do’s: Defining only a due date on todo list items
When you create a to-do item with only a due date, it will show up as a green checkmark in the gantt chart (just like events with only a start date):
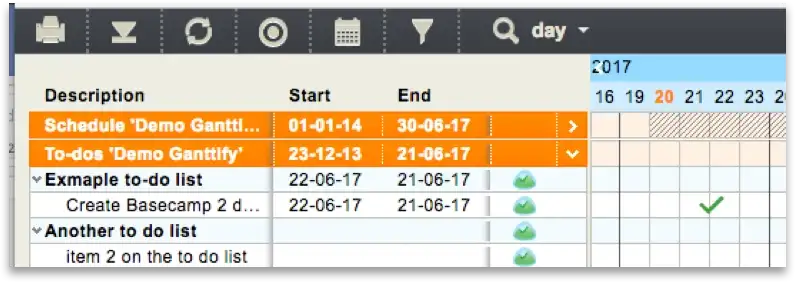
Refresh your gantt chart and the checkmark will show up like this:
To-do’s: Creating period bars
Now we’re going in for the more advanced tricks Ganttify is capable of. As you might have noticed, Basecamp 2 only offers you the ability to add a single due date to a to-do. Ganttify cannot create a period bar (having a start and end date, or start date and duration) based on one single date. Therefore, we allow our users to add start dates and/or duration information right in the to-do description.
Adding duration information
When you add the text “duration:2d” to your to-do’s name, Ganttify will know that this to-do will take two days. When you add a due date as well, Ganttify automatically calculates the start date (due date minus 2 days in this example) and will show the to-do as a timeblock:
At the moment of writing, Ganttify supports two kinds of duration data: hours (h) and days (d). So when your to-do just takes an hour to finish, you simply add “duration: 1h” to the to-do’s name, without the quotes.
Adding a start date
Sometimes you want to define the period by setting a start and end date for a to-do. In Basecamp 2, we always use the to-do’s due date as an end date. Therefore, all we need to do is add a start date to the to-do’s name just like we did with durations:
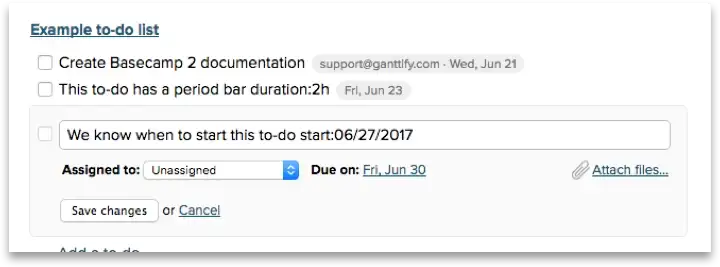
Currently, the required date format for start dates is MONTH / DAY / YEAR, two numbers per unit. In the example above we’ve set the start date on June 27, 2017: 06/27/2017
Conclusion
You are now able to create both single and multi day Gantt chart activities from your Basecamp ‘Events ’ and ‘To-do lists ’. These activities are beautifully displayed in the Gantt chart, and together they will allow for a clear and precise big picture overview of any of your projects. Go to your Ganttify account and start creating gantt charts for your Basecamp 2 projects today.
Happy Ganttify’ing!